Tag: Visual edit |
Tag: Visual edit |
||
| (12 intermediate revisions by 6 users not shown) | |||
| Line 74: | Line 74: | ||
|- |
|- |
||
! scope="row" |[[File:Chef.png|36px]] |
! scope="row" |[[File:Chef.png|36px]] |
||
| + | |The Chef |
||
| ⚫ | |||
| + | (Part 1 |
||
|The chef needs help finding ingredients |
|The chef needs help finding ingredients |
||
| + | |Cooking Level: 10 |
||
| − | |(not 100%) level 10 Exploring |
||
| + | |||
| + | Exploring Level: 5 |
||
|[[File:Apple.png|20px|link=Apple]] 1 [[Apple]] |
|[[File:Apple.png|20px|link=Apple]] 1 [[Apple]] |
||
| Line 83: | Line 86: | ||
|- |
|- |
||
! scope="row" |[[File:GeodeMiner.png|36px]] |
! scope="row" |[[File:GeodeMiner.png|36px]] |
||
| + | |The Miner |
||
| − | |Opening Geodes |
||
|The miner wants to teach you about geodes |
|The miner wants to teach you about geodes |
||
|Find a geode |
|Find a geode |
||
| Line 91: | Line 94: | ||
! scope="row" |[[File:Knight.png|36px]] |
! scope="row" |[[File:Knight.png|36px]] |
||
|The Knight (Part 1) |
|The Knight (Part 1) |
||
| − | |The knight wants |
+ | |The knight wants further your experience in fighting |
| + | |Kill any monster in the fields |
||
| − | |Encounter a bear in caves |
||
| − | |[[File:BrokenSwordArtifact.png|20px]] 1 [[Exploring|broken sword]] |
||
| − | 5 min waiting |
||
| − | |[[File:RustySword.png|20px|link=Fields#Exploring_Loot]] [[Fields#Exploring_Loot|Rusty Sword]], |
||
| − | Ability to equip weapon and armour, |
||
| ⚫ | |||
| − | [[File:Combat.png|20px|link=Combat]] [[Combat]] |
||
| + | |Defeat the knight in combat |
||
| + | |[[File:KnightsCape.png|25px]] |
||
|- |
|- |
||
! scope="row" |[[File:Gambler.png|36px]] |
! scope="row" |[[File:Gambler.png|36px]] |
||
| Line 141: | Line 142: | ||
|Plant a gold apple seed and harvest it |
|Plant a gold apple seed and harvest it |
||
|Ability for Chef to wear mineral necklace and ask the npc Chef to cook you meals with some ingredients |
|Ability for Chef to wear mineral necklace and ask the npc Chef to cook you meals with some ingredients |
||
| ⚫ | |||
| + | |[[File:Hi.png|thumb|60x60px]] |
||
| + | |Gem Goblin |
||
| + | (Part 1) |
||
| + | |A gem goblin wants him to find his brother who have taken his gem bag. His brother could be found in any areas |
||
| + | |Sell a Sapphire |
||
| + | |||
| + | Sell an Emerald |
||
| + | |||
| + | Sell a Ruby |
||
| + | |||
| + | Sell a Diamond |
||
| + | |||
| + | Mining Level 500 |
||
| + | |Loot the Gem Goblin's bag from his brother. |
||
| + | Open the Gem Goblin's Bag. |
||
| + | |Access to Gem Goblin Shop. |
||
| ⚫ | |||
| + | |[[File:Hi.png|thumb|79x79px]] |
||
| + | |Gem Goblin |
||
| + | (Part 2) |
||
| ⚫ | |||
| + | |Traded with the Gem Goblin 30 time |
||
| ⚫ | |||
| ⚫ | |||
| ⚫ | |||
| + | |[[File:Magic_bamboozler.png|36px]] |
||
| + | |The Witch |
||
| + | (Part 2) |
||
| ⚫ | |||
| + | |Own a blood diamond berserker amulet |
||
| + | Explore the castle once |
||
| ⚫ | |||
| ⚫ | |||
| ⚫ | |||
| + | |[[File:Chef.png|36px]] |
||
| + | |The Chef |
||
| + | (Part 3 |
||
| ⚫ | |||
| + | |Created 5 recipes with the Chef |
||
| ⚫ | |||
| + | |Ability to reroll your current meals once per recipe (rerolls all 3 of them). |
||
|} |
|} |
||
| Line 179: | Line 222: | ||
[[File:BloodCrystals.png|20px|link=Blood_Crystals]] 50 [[Blood Crystals]] |
[[File:BloodCrystals.png|20px|link=Blood_Crystals]] 50 [[Blood Crystals]] |
||
|} |
|} |
||
| − | '''''As of 4/24/2019, it does not matter which house you build.'''''<br /> |
+ | '''''As of 4/24/2019, it does not matter which house you build.'''''<br />'''Quest Reward''': A house, a [[Treasure Chest]] and 250 [[Energy]]. |
| − | '''Quest Reward''': Your own house that will hold various things you unlock later in the game. |
||
<center> |
<center> |
||
| Line 221: | Line 263: | ||
<center> |
<center> |
||
| − | <h2><u>The Knight (Part 1)</u></h2> |
+ | <h2><u>The Knight (Part 1)</u></h2></center> |
| ⚫ | |||
| − | '''Requirement''': |
+ | '''Requirement''': Kill any monster in the fields; |
| + | Explore the forest. |
||
| − | The first time you try to explore the caves, you will run into a bear, which then proceeds to chase you out. A knight hears about this encounter, and offers to teach you how to defend yourself. But first, he needs to build you a sword. |
||
| − | # Explore the fields. Once you get the artifact that looks like a sword (See above ^ ), keep it. |
||
| − | # Go back into quests to give the sword to the knight to repair it. You will have to wait for five minutes while he works. |
||
| − | Once the sword is finished, you are able to fight against enemies using your newfound rusty sword. For more on combat, see the page on the wiki. |
||
| + | A knight sees you have experience in combat. He tells you the three A's in combat: |
||
| − | '''Quest Rewards''': Rusty Sword, Ability to fight in exploring areas. |
||
| + | # Attack - How hard you can hit. |
||
| − | |||
| + | # Accuracy - How often you hit your enemy based on their defense. |
||
| − | <center> |
||
| + | # Armor - How often you block your enemy's hits based on their accuracy. |
||
| + | At this point you probably have no armor. He offers you a knight cape for 1 defense if you defeat him.<center> |
||
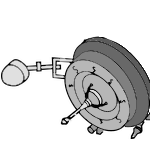
<h2><u>The Silver Statue</u></h2>[[File:SilverStatueMetalDetector.png|thumb|200x200px]] |
<h2><u>The Silver Statue</u></h2>[[File:SilverStatueMetalDetector.png|thumb|200x200px]] |
||
| Line 339: | Line 379: | ||
|- |
|- |
||
|[[File:RoverTires.png|50px]]<br />Rover Tires |
|[[File:RoverTires.png|50px]]<br />Rover Tires |
||
| − | | 100 Tar, |
+ | | 100 Tar (from the Ocean, ~8 each trip) |
| + | 250 Iron bars |
||
|- |
|- |
||
|[[File:BronzeWire.png|50px]]<br />Copper Wire |
|[[File:BronzeWire.png|50px]]<br />Copper Wire |
||
| Line 345: | Line 386: | ||
|- |
|- |
||
|[[File:SolarPanels.png|50px]]<br />Solar Panels |
|[[File:SolarPanels.png|50px]]<br />Solar Panels |
||
| − | | 12 Glass, |
+ | | 12 Glass (from the Desert, ~12 each trip) |
| + | 250 Silver bars |
||
|} |
|} |
||
<font size="1"><nowiki>*</nowiki>Tar is found in Ocean bags, glass you make from sand found in desert bags.</font> |
<font size="1"><nowiki>*</nowiki>Tar is found in Ocean bags, glass you make from sand found in desert bags.</font> |
||
| Line 363: | Line 405: | ||
'''Quest Rewards''': Chef can prepare meals for you, there are 3 tiers of meals, each tier requires more ingredients, but rewards more energy. After completing the recipe your chef has to rest for 5 days. Also your chef can wear your mineral necklace for a chance of getting a food crate. |
'''Quest Rewards''': Chef can prepare meals for you, there are 3 tiers of meals, each tier requires more ingredients, but rewards more energy. After completing the recipe your chef has to rest for 5 days. Also your chef can wear your mineral necklace for a chance of getting a food crate. |
||
| ⚫ | |||
| + | |Exemple of possible meals |
||
| + | |- |
||
| + | |[[File:Meal1.JPG|thumb|281x281px]] |
||
| + | |- |
||
| + | |[[File:Meal2.JPG|thumb|297x297px]] |
||
| + | |- |
||
| + | |[[File:Meal3.JPG|thumb|236x236px]] |
||
| + | |} |
||
<center> |
<center> |
||
| Line 420: | Line 471: | ||
<center> |
<center> |
||
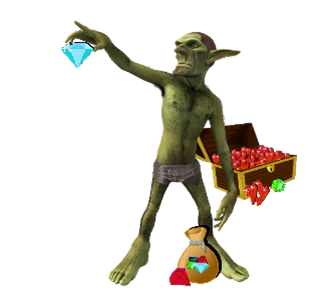
<h2><u>The Gem Goblin</u></h2> |
<h2><u>The Gem Goblin</u></h2> |
||
| ⚫ | |||
| ⚫ | |||
| + | {| class="article-table" |
||
| ⚫ | |||
| − | After scamming yourself a thinner gem goblin a.k.a scammer shows up and starts to bother you when you're tidying up your farming patches. Apparently his larger |
+ | After scamming yourself a thinner gem goblin a.k.a scammer shows up and starts to bother you when you're tidying up your farming patches. Apparently his larger [https://diamondhuntmobile.fandom.com/wiki/Gem_Goblin brother] has stolen his bag full of gems and you're the one that has to get it back. when you finally find the goblin and get the bag, you can peek into it and then you can give it back to thin goblin, once you do that gem goblin shop is open. |
'''Quest Rewards''': |
'''Quest Rewards''': |
||
Some crappy items, gem goblin shop with his most amazing deals. |
Some crappy items, gem goblin shop with his most amazing deals. |
||
| + | |||
| ⚫ | |||
| − | ![[File:56F64E2D-7A78-4857-A7B7-21E587962B3F.jpeg|thumb|268x268px]] |
||
| − | ! |
||
| − | ! |
||
| − | ! |
||
| ⚫ | |||
| ⚫ | |||
| ⚫ | |||
| ⚫ | |||
| ⚫ | |||
|- |
|- |
||
|[[File:Gemgoblinshop.JPG|thumb|244x244px]] |
|[[File:Gemgoblinshop.JPG|thumb|244x244px]] |
||
| + | |||
| ⚫ | |||
| ⚫ | |||
| ⚫ | |||
| ⚫ | |||
| ⚫ | |||
| ⚫ | |||
| ⚫ | |||
| ⚫ | |||
| ⚫ | |||
|} |
|} |
||
| Line 458: | Line 496: | ||
Notes: It says you need a blood diamond berserker amulet, but the requirements say you need diamond berserker amulet. |
Notes: It says you need a blood diamond berserker amulet, but the requirements say you need diamond berserker amulet. |
||
| + | [[Category:Mechanics]] |
||
Revision as of 19:32, 28 July 2020
|
|
'''Note that this article is still under construction.'''
|
| Name | Description | Trigger | Objective | Reward | |
|---|---|---|---|---|---|
| The Witch's Potion | A witch needs your help with finding ingredients | Cast the fire spell in combat 10 times | |||
| The Silver Statue | A talking silver statue wants your help | Complete quest: opening geodes and explore cave 5 times | A silver statue (with or without stars) | 5,000-50,000 exploring XP based on the statue's stars (or lack of) | |
| The Teddy Bear (Part 1) | An explorer is looking for a teddy bear | Open a total of 30 loot bags from fields, forests or caves. |
|
Ability to click a loot bag and see the drop rates for that area, as well as 50M coins. | |
| The Teddy Bear (Part 2) | The explorer’s kid wants a new style for his teddy bear | Kill all enemies in the volcano |
|
Ability to further examine loot drop chances. | |
| The Carpenter | The carpenter has asked you if you wanted a home | Achieve level 160 |
|
Access to house tab | |
|
Access to house tab | ||||
|
Access to house tab | ||||
| The Chef
(Part 1 |
The chef needs help finding ingredients | Cooking Level: 10
Exploring Level: 5 |
|
||
| The Miner | The miner wants to teach you about geodes | Find a geode | chisel | Ability to open geodes | |
| The Knight (Part 1) | The knight wants further your experience in fighting | Kill any monster in the fields
Explore the forest |
Defeat the knight in combat | ||
| The Gambler | The Gambler wants to make a bet with you. | Level 50 exploring | Coins | Upon winning, you receive double the amount of coins you entered and receive A Gold Well and a Blood Well which allow for community gambling with coins and blood crystals, respectively. | |
| The Engineer (Part 1) | The engineer can help you with innovation. | 5 trips to the moon with the rocket | Rover Blueprints requiring Tires, Copper Wire, Solar Panels, 10B gold | Rover | |
  |
The Looting Ring | A ring with exceptional power. | Kill a lava snake and have a diamond in inventory. | A diamond | Looting Ring |
| The knight (Part 2) | The knight wants to talk to you about presets | Kill a shark | Set 3 presets | Ability to set presets | |
| The Engineer (Part 2) | The engineer wants you to build a satellite | Collect more than 4 plasma over multiple trips to the sun | Recover blueprints (dropped by castle mage in Castle) Antenna (100,000 iron bars), base (6k promethium bars, 1k titanium bars) and solar panel (12 glass 50k silver bars) journey to the sun, remember 20,437/h | Ability to collect more plasma | |
| The Chef (Part 2) | The Chef wants you to help him plant a seed and harvest it | Having a diamond or blood diamond machete | Plant a gold apple seed and harvest it | Ability for Chef to wear mineral necklace and ask the npc Chef to cook you meals with some ingredients | |
  |
Gem Goblin
(Part 1) |
A gem goblin wants him to find his brother who have taken his gem bag. His brother could be found in any areas | Sell a Sapphire
Sell an Emerald Sell a Ruby Sell a Diamond Mining Level 500 |
Loot the Gem Goblin's bag from his brother.
Open the Gem Goblin's Bag. |
Access to Gem Goblin Shop. |
 |
Gem Goblin
(Part 2) |
Traded with the Gem Goblin 30 time | |||
| The Witch
(Part 2) |
Own a blood diamond berserker amulet
Explore the castle once |
||||
| The Chef
(Part 3 |
Created 5 recipes with the Chef | Ability to reroll your current meals once per recipe (rerolls all 3 of them). |
More detailed Walkthroughs:
These are more step-by-step instructions for quests, than the basic overviews shown above.
Quests are in the order you will most likely receive them in, though it can vary.
The Carpenter


Requirement: Global level 160
The carpenter will ask you if you want to build a house. You have a choice of 3 different houses.
| House | Materials |
|---|---|
| |
| |
|
As of 4/24/2019, it does not matter which house you build.
Quest Reward: A house, a Treasure Chest and 250 Energy.
Explore to cook
Requirement: Level 5 Cooking
You will find a cook who wants you to find him some ingredients. He wants an apple and a potato. As the title suggests, you have to find these objects through exploring.
Quest Reward: ![]() 50 Maple Logs
50 Maple Logs
Opening Geodes
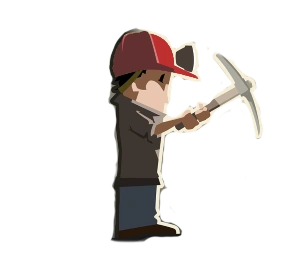
Requirement: Mining research perk 3, a geode
Once you find a geode, you can't do anything with it. At least, not yet. But one of your miners is able to help you. If you get him a chisel which you craft in your crafting tab, you can pay him to open your geodes for you.
Quest Reward: Ability to open geodes for mining XP.
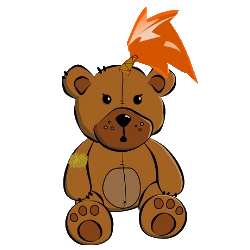
The Teddy Bear (Part 1)
Requirement: Open a total of 30 loot bags from exploring, carpenter quest completed (since the bear appears in the house once it's found)
After finding 30 loot bags, a child will come to you and tell you the have lost their teddy bear while playing in the forest. Naturally, you are the one who has to retrieve it.
- Explore the forests. You'll find the teddy bear in a loot bag.
- Explore the caves. The teddy bear is broken, and you need some real bear fur to fix it. Bear fur is a drop from the caves loot bags, and bears. You may also trigger the knights quest by doing this.
- Go to your house (obtained from the quest "the carpenter"), and repair the teddy bear with bear fur. Go back to the quests tab, and return the bear for your reward.
Quest Reward: Ability to see the possible loot in a loot bag.
The Knight (Part 1)
Requirement: Kill any monster in the fields;
Explore the forest.
A knight sees you have experience in combat. He tells you the three A's in combat:
- Attack - How hard you can hit.
- Accuracy - How often you hit your enemy based on their defense.
- Armor - How often you block your enemy's hits based on their accuracy.
At this point you probably have no armor. He offers you a knight cape for 1 defense if you defeat him.
The Silver Statue

Requirement: Completed Opening Geodes quest and explored caves 5 times.
A talking silver statue will ask you to give it a silver statue. Silver Statues are found in the caves.
You will get a certain amount of exploring xp based on the quality of the statue.
(To right: a statue that can be used for the quest)
| Regular | Bronze | Silver | Gold |
|---|---|---|---|
| 5,000 xp | 10,000 xp | 20,000 xp | 50,000 xp |
If you are struggling in leveling exploring, it is recommended that you give away a gold star one.
Quest Reward: Exploring XP, shown in table above.
The Gambler
Requirement: 50 Explore level or unlocked volcano
A gambler will approach and make a bet. You can bet a predefined number of coins to try and win double the amount back. He will roll a die.
- If the die returns 1-3, You Win! You get double the gold back, and a reward
- If it gets 4-6, he wins, and takes your money.
Once you win, he gives you a different gambling game, wells.
Quest Reward: Blood Crystal and Coin gambling wells.
The Teddy Bear (Part 2)
Requirement: Kill every monster in volcano at least once
The lady comes back and says her son wants a new hairstyle for his Teddy Bear. You need the Golem Hair from the Golem in the Northern Fields. (The monster with the bow) This can be killed easily with the fireball spell and the skeleton shield. Once you find it, bring it back to the girl to build the new and improved teddy bear.
Quest Rewards: 50,000,000 gold and exact numbers when examining loot bags.
The Witch's Potion
Requirement: Cast the fire spell 10 times.
A Witch noticed that you can do magic. She wants you to help her find these ingredients for her potion:
- Rat's Tail: You will get this from a rat only during this quest.
- Spider Legs: These are artifacts found in Haunted Mansion lootbags.(Exploring 110, 20k energy)
- Logs from a living tree: You need ent logs, from the ent in the forest.
- Haunted Logs: You can get these from haunted trees(Woodcutting 150)or Haunted Mansion lootbags.
Once you have all of the ingredients, she reveals why she wanted you to know magic: She needs you to cast your Fire Spell to heat up the cauldron. To do this, you enter combat with her, and cast fire spell once. This completes the quest and gets you your reward.
Quest Rewards: The Reflect Spell Scroll (found in your explore tab). This allows you to block an enemies attack and reflect the damage back towards them.
The Looting Ring

Requirement: Killed a lava snake. The quest is triggered when you find your next diamond.
A mage has found a ring and sees you have a diamond. The ring needs diamonds to charge it. He asks you for the diamond. When you get the ring, he figures out its use. It increases the chance of getting a rare drop from a monster. He tells you to kill a bee in the fields to test the ring out.
If you kill a bee in the fields with the ring equipped, you will get a stinger. The mage was right. However, for now, it only works in the fields. But for every diamond you use with the ring, you can upgrade it to work in the next area.
Quest Rewards: An upgradable looting Ring (one diamond per zone), which doubles your rates on finding equipment items from monsters.
The Knight (Part 2)
Requirement: Kill a shark in ocean.
Mighty knight shows up again, this time he wants to teach you amazing, secret technique of changing your gear during a battle with a single click - the presets! You'll find them in your gear tab below your combat stats. All you have to do is click a little icon next to preset name and it will save your currently equipped items (rings don't need saving) and you can now quickly switch between gear sets during a fight!
Quest Rewards: 3 Presets
The Engineer (Part 1)
Requirement: Send your rocket to space 5 times.
An engineer has a great idea that will help you with your adventures in spaces. He wants you to craft a rover, that genius even has blueprints ready. Here is what he needs you to craft:
| Name | Materials |
|---|---|
 Rover Tires |
100 Tar (from the Ocean, ~8 each trip)
250 Iron bars |
 Copper Wire |
1000 Bronze bars |
 Solar Panels |
12 Glass (from the Desert, ~12 each trip)
250 Silver bars |
*Tar is found in Ocean bags, glass you make from sand found in desert bags.
After crafting all the items all you have to do is pay small price of 10B coins.
Quest Rewards: Triple loot and an additional chance of finding titanium from your rocket.
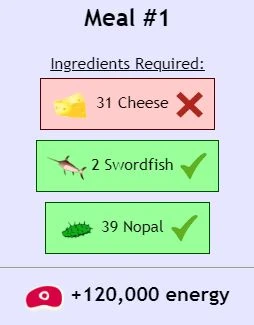
The Chef (Part 2)
Requirement: Machete (found in jungle lootbags) with a diamond socketed, 300 Farming level
Gordon Ramsay has another quest for you. Your task is simple, just plant the golden apple tree seed he gives you, there is no catch... Except that the golden apple tree stops dying at farming level 1500 and has increased chance of dying. Easy. If your gardening skills fail you, you can buy a new one from the chef for 1B coins, not a scam at all. After successfully growing the tree you can talk with the chef again. Reward is well worth the effort.
Quest Rewards: Chef can prepare meals for you, there are 3 tiers of meals, each tier requires more ingredients, but rewards more energy. After completing the recipe your chef has to rest for 5 days. Also your chef can wear your mineral necklace for a chance of getting a food crate.
| Exemple of possible meals |
  |
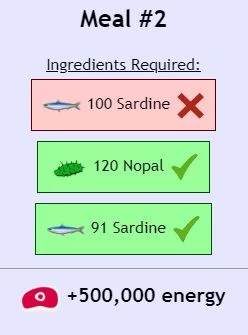 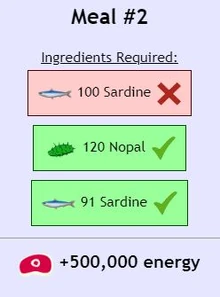 |
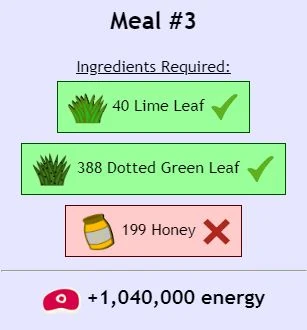 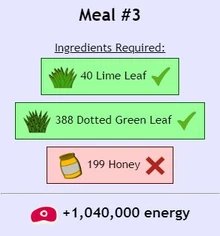 |
The Engineer (Part 2)
Requirement: Collect at least 4 plasma.
Mr. Genius has another invention for you. This time he came up with an idea of building a satellite, unfortunately, this time his blueprints got stolen by mage found in castle. After getting them back you're presented with lista of items to craft:
| Name | Materials |
|---|---|
 Antenna |
100,000 Iron bars |
 Base |
6,000 Promethium bars, 1000 Titanium bars |
 Solar Panels |
12 Glass, 50,000 Silver bars |
After crafting the satellite you will receive a number needed later. Send your rocket to the sun and when it arrives put your number into the satellite. Now you have your own satellite, praise the science.
Quest Rewards: Quadruple plasma loot from rocket.
The Chef (Part 3)
Requirement: Create 5 recipes with the chef.
Culinary virtuoso has another simple task for you. Craft a stew. And all you need is just a few spices! Well... you need 4 kinds of spices: Yellow, Red, Green and Blue. All of obtained in different way:
- Yellow are obtained from food crates (found with mineral necklace),
- Red is obtained from volcano lootbags (very rare) or fire skeleton boss found in cemetery,
- Green are obtained from green chests (they steal one of your chest rolls!),
- Blue are obtained from crystal or striped crystal leaf harvests.
Sadly that's not all. Now you need to mix your stew, you'll need a certain amount of each spice varying from 1 to 5 (it's random for each player). After adding spices you give the stew to the chef who will taste it, his taste it terrible so you have to be perfect.
A still annoying, but simpler way is to try one spice at the time, the chef will kindly tell you when the amount of a spice you added is correct. This way you need at most 15 of each spice. When you have all correct numbers you mix the final stew adding all the spices and make your chef a happy man.
Quest Rewards: Ability to reroll your current meals once per recipe (rerolls all 3 of them).
The Looting Ring (Part 2)

Requirement: Explore blood moon (zone after deep ocean), 1 Blood Diamond
You try to stare at the blood moon, but instead of seeing the moon, it's again that suspicious mage with the longest beard you have ever seen. He came for your precious diamonds again, although this time he wants your blood diamonds. After giving him one he upgrades your current looting ring to its blood diamond version which allows you to stare at the blood moon. Ring works the same way as normal one did, now it also works on zones affected by blood moon and needs blood diamonds per upgrade.
Quest Rewards: Ability to trigger personal blood moon for 3 hours. An upgrade to your looting ring (one blood diamond per zone), which doubles your rates on finding equipment items from monsters in blood moon areas.
The Gem Goblin
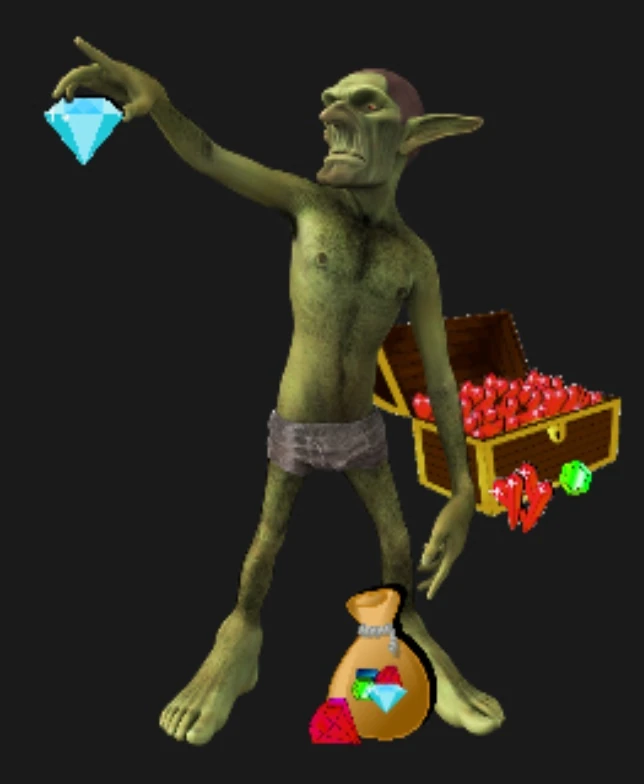  After scamming yourself a thinner gem goblin a.k.a scammer shows up and starts to bother you when you're tidying up your farming patches. Apparently his larger brother has stolen his bag full of gems and you're the one that has to get it back. when you finally find the goblin and get the bag, you can peek into it and then you can give it back to thin goblin, once you do that gem goblin shop is open. Quest Rewards: Some crappy items, gem goblin shop with his most amazing deals. |
|---|
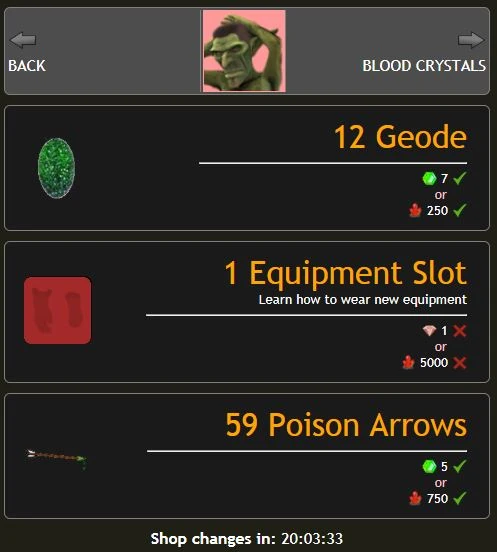  Here is an exemple of what to expect from his store ... |
Witches potions (Part 2)

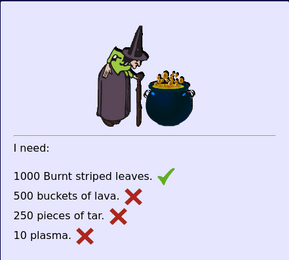
Requirements: Blood diamond beserker amulet, explored the castle once
The witch has concocted a new mysterious potion. She requires 1,000 burnt stripe leaves, 500 buckets of lava, 250 pieces of tar, and 10 plasma.
Quest rewards: You absorb the Blood Diamond Berserker Amulet, allowing you to receive the benefits at all times while wearing a different amulet.
Notes: It says you need a blood diamond berserker amulet, but the requirements say you need diamond berserker amulet.